2316 Views
 August 14, 2019
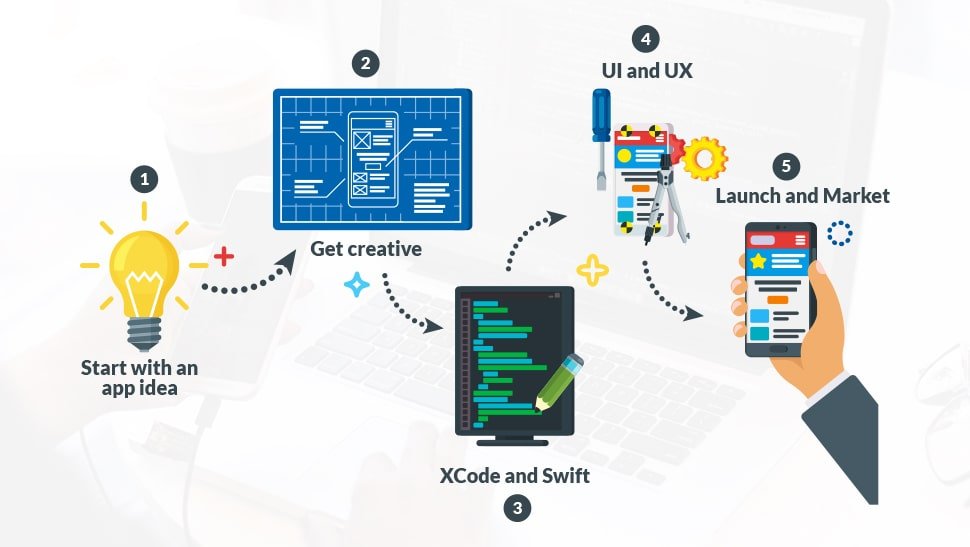
So you’re thinking about launching your first iOS application, or maybe it’s been a while since the last time your mobile app went live? Either way, simple iPhone app development is not as complex a procedure as it seems.
In fact, over a thousand apps are released in the App Store on average, every day.
So we’ve compiled the basic steps involved to help you create successful iPhone apps.
Step 1: Start with an app idea
Got a unique idea for your app?
As you probably know, there are millions of apps out there. So, why would anyone want to use yours? What makes your app idea stand out? Why would people pay to be able to use your app, if you choose to charge for it?
Before you actually start the iPhone app development process, make sure you have a credible answer to each of these questions.
It’s important to do your research and check if there are any other apps in the market that provide the same services as yours. Thorough market research and analysis of trends will help you identify what kind of application you should work on, and what kind of need does it fulfill.
In case you’d like to create an app that already exists, then think about different ways to make your app better, and the value that it will deliver to users.
Put all your ideas on paper or screen and start from there.
Step 2: Get creative
It always helps to break down the visual elements you have in mind. What theme colors you’d like to incorporate, will it be more fun or serious, what kind of movement would you like to see?
Spending time to brainstorm about the overall look and feel of your app, keeping in mind factors like target audience, resources and time, will help give you a better idea of what the final result should look like. And in case you decide to get an app development agency working on it, then it’ll be easier for you to communicate your vision.
Step 3: Use a Mac
Everyone knows iPhone is an Apple product and uses a variation of the Mac OS.
Presently, iPhone app development tools are only accessible to Mac users. And even though many people try to find loopholes in this entire arrangement, they soon realize that they need a Mac to get an app live on the App store.
If budget is an issue, and you don’t have a Mac at your disposal, a Mac mini should work just fine – it’s relatively cheaper and gets the job done. To be able to work with the Mac tool, you will also have to officially register yourself as an Apple Developer. The registration is free and involves a simple exchange of basic information, and an agreement to terms and conditions.
After you become an official Apple Developer, you will be able to create apps for any Mac product range.
Step 4: Swift vs. XCode vs. Objective C
So you’ve heard of Swift, Objective C, and Xcode, but aren’t sure which one to invest your time and energy in, for your perfect iPhone app? Well, we’ve been where you are, but there’s nothing a little reading and practice can’t fix.
To begin with, you need to understand the difference between each of these three.
Apps are built on codes or languages. And you can select which language or code you’d prefer for your app, but you will need to install XCode for iOS app development.
XCode is a program that contains a whole bundle of features and tools that are essential for iPhone app development. From debugging tools to a comprehensive project manager, this program has everything you need to develop a simple iPhone application.
Objective C and Swift are the actual codes or languages to develop your application in. So you’ll need to decide which one you’re more comfortable with and can deliver the best user experiences.
Although XCode will be able to run both codes, in our experience, Objective C can be more complicated to learn for beginners. In comparison, Swift is much easier and is also the default language for building iOS apps.
For this reason, we recommend investing time and effort learning Swift code, and downloading the XCode bundle, to make sure your app is popping!

Step 5: Thinking UI & UX
Once you’ve got all your tools in place, you need to start working your app’s UI and UX. You use your tools to incorporate the right fonts, colors, and structures that collectively shape user interactions, and bring desired app features and user journeys to life.
App development can be categorized into two parts; front end and back end.
The first includes everything your user will be able to see and interact with while using your app, from fonts and images to use workflow and app features.
Back end development, on the other hand, includes all the work that takes place ‘behind the scenes’ that users aren’t able to see or interact with. This may include integrating and managing databases, frameworks, and APIs, that enable your app to function.
At the end of this stage, you should have whipped your first version of your iOS application – aka the beta version of your app. Congratulations! Your iOS app development journey is nearly over.
Step 6: Prelaunch app testing
Before your iOS app is made available to use in the App Store, it’s essential to test it.
There are several ways you could go about the prelaunch app testing. From making your app available to smaller communities online to availing Apple services that test it out for you, like Testflight, quality assessment is an important part of app development and launch process.
Keep in mind that this testing phase can take time, depending on the nature and complexity of your app. As people use it, they’ll be able to narrate their experiences and identify bugs, and issues that might’ve been overlooked.
Keep an open mind, equip yourself with a problem-solving attitude and remember, a little perspective goes a long way!

Step 7: Launch, Market & Respond to Feedback!
Once you have tested your app and worked through all the bumps on the road, you will be able to submit it to iTunes for approval. The approval process can take some time, and more often than not requires a thorough understanding of their criteria, terms and conditions.
If your app is paid, just wait for the word to pass around and for money to roll in. If you have created a free app, watch out for all the traffic to come your way.
A lot of app developers make the mistake of thinking their work is done, at this stage. On the contrary, fellow app enthusiasts, it’s essential to understand that your success journey has only just begun.
Marketing your app in the most effective ways and ensuring continuous app support and maintenance services to your users, are crucial elements that can differentiate a long-term successful app, from one that only lasts for a short while. You’ll want to make sure you keep a regular check on what people are saying about your app, and respond to their feedback, to deliver better experiences.
To make sure your iPhone app reaches your audiences and connects with them, check out these 65 simple ways to promote your mobile app by Forbes.