With the UK’s Competition and Markets Authority pushing for major changes in Apple’s App Store rules, could 2025 be the year that the way you upload an App to the iOS App Store changes forever? This question is on the mind of thousands of developers.
The App Store remains one of the most lucrative marketplaces in the world, but as regulations shift in the UK, EU, and Australia, developers are wondering what this means for their next iOS App Store publish.
The good news? No matter if you are a startup founder and solo developer or part of a bigger studio, the overall process of uploading an App to the iOS App Store is pretty straightforward. And we’ll unfold that.
This guide will take you step by step, from planning to after the release, and provide you with facts, advice, and relevant compliance news for each step to notify and keep you up to date.
Perks of getting your app listed on the iOS App Store
Before we get into the steps, it’s worth understanding why you should now type in Google’s search bar “how to get an app on the App Store” or learn it from below.
-
Access To The Global Audience
You get access to the global audience. According to Apple, “Your app can instantly reach 2.35 billion Apple devices across 175 regions. . So if discoverability was your main concern, you know what to do.
-
High Revenue Potential
iOS users are known for higher in-app spending compared to Android users. Whether through in-app purchases, subscriptions, or premium downloads, your app has better chances of generating solid revenue on the App Store.
-
Strong Brand Credibility
Getting approved by Apple adds credibility to your app. Since Apple maintains strict guidelines for quality and security, being listed on the App Store instantly signals trust and professionalism to users.
-
Built-In Marketing & Visibility Tools
The App Store offers built-in features like search optimization, app previews, ratings, and reviews that help boost visibility. You can also run Apple Search Ads to directly target potential users.
-
Access to Apple’s Ecosystem
By being on the App Store, your app becomes part of Apple’s ecosystem—integrating smoothly with iPhones, iPads, Apple Watch, and even Siri. This creates more engagement opportunities and a seamless user experience.
The Newly Listed Apps On The App Store Are Making Millions. Why can’t you?
Now is the time to get the financial freedom you’ve been dreaming of! List your app on the App Store and start losing count of the money you earn.
Start your journey today!How to Upload an App to the App Store?
Publishing an app on the App Store may sound simple, but Apple’s strict guidelines and review process mean it requires careful preparation. From polishing your app’s performance to setting up your developer account, every step matters if you want approval on the first try.
Below, we’ll walk you through a step-by-step guide on how to make an app on the App Store, ensuring your app is ready to go live without unnecessary delays.
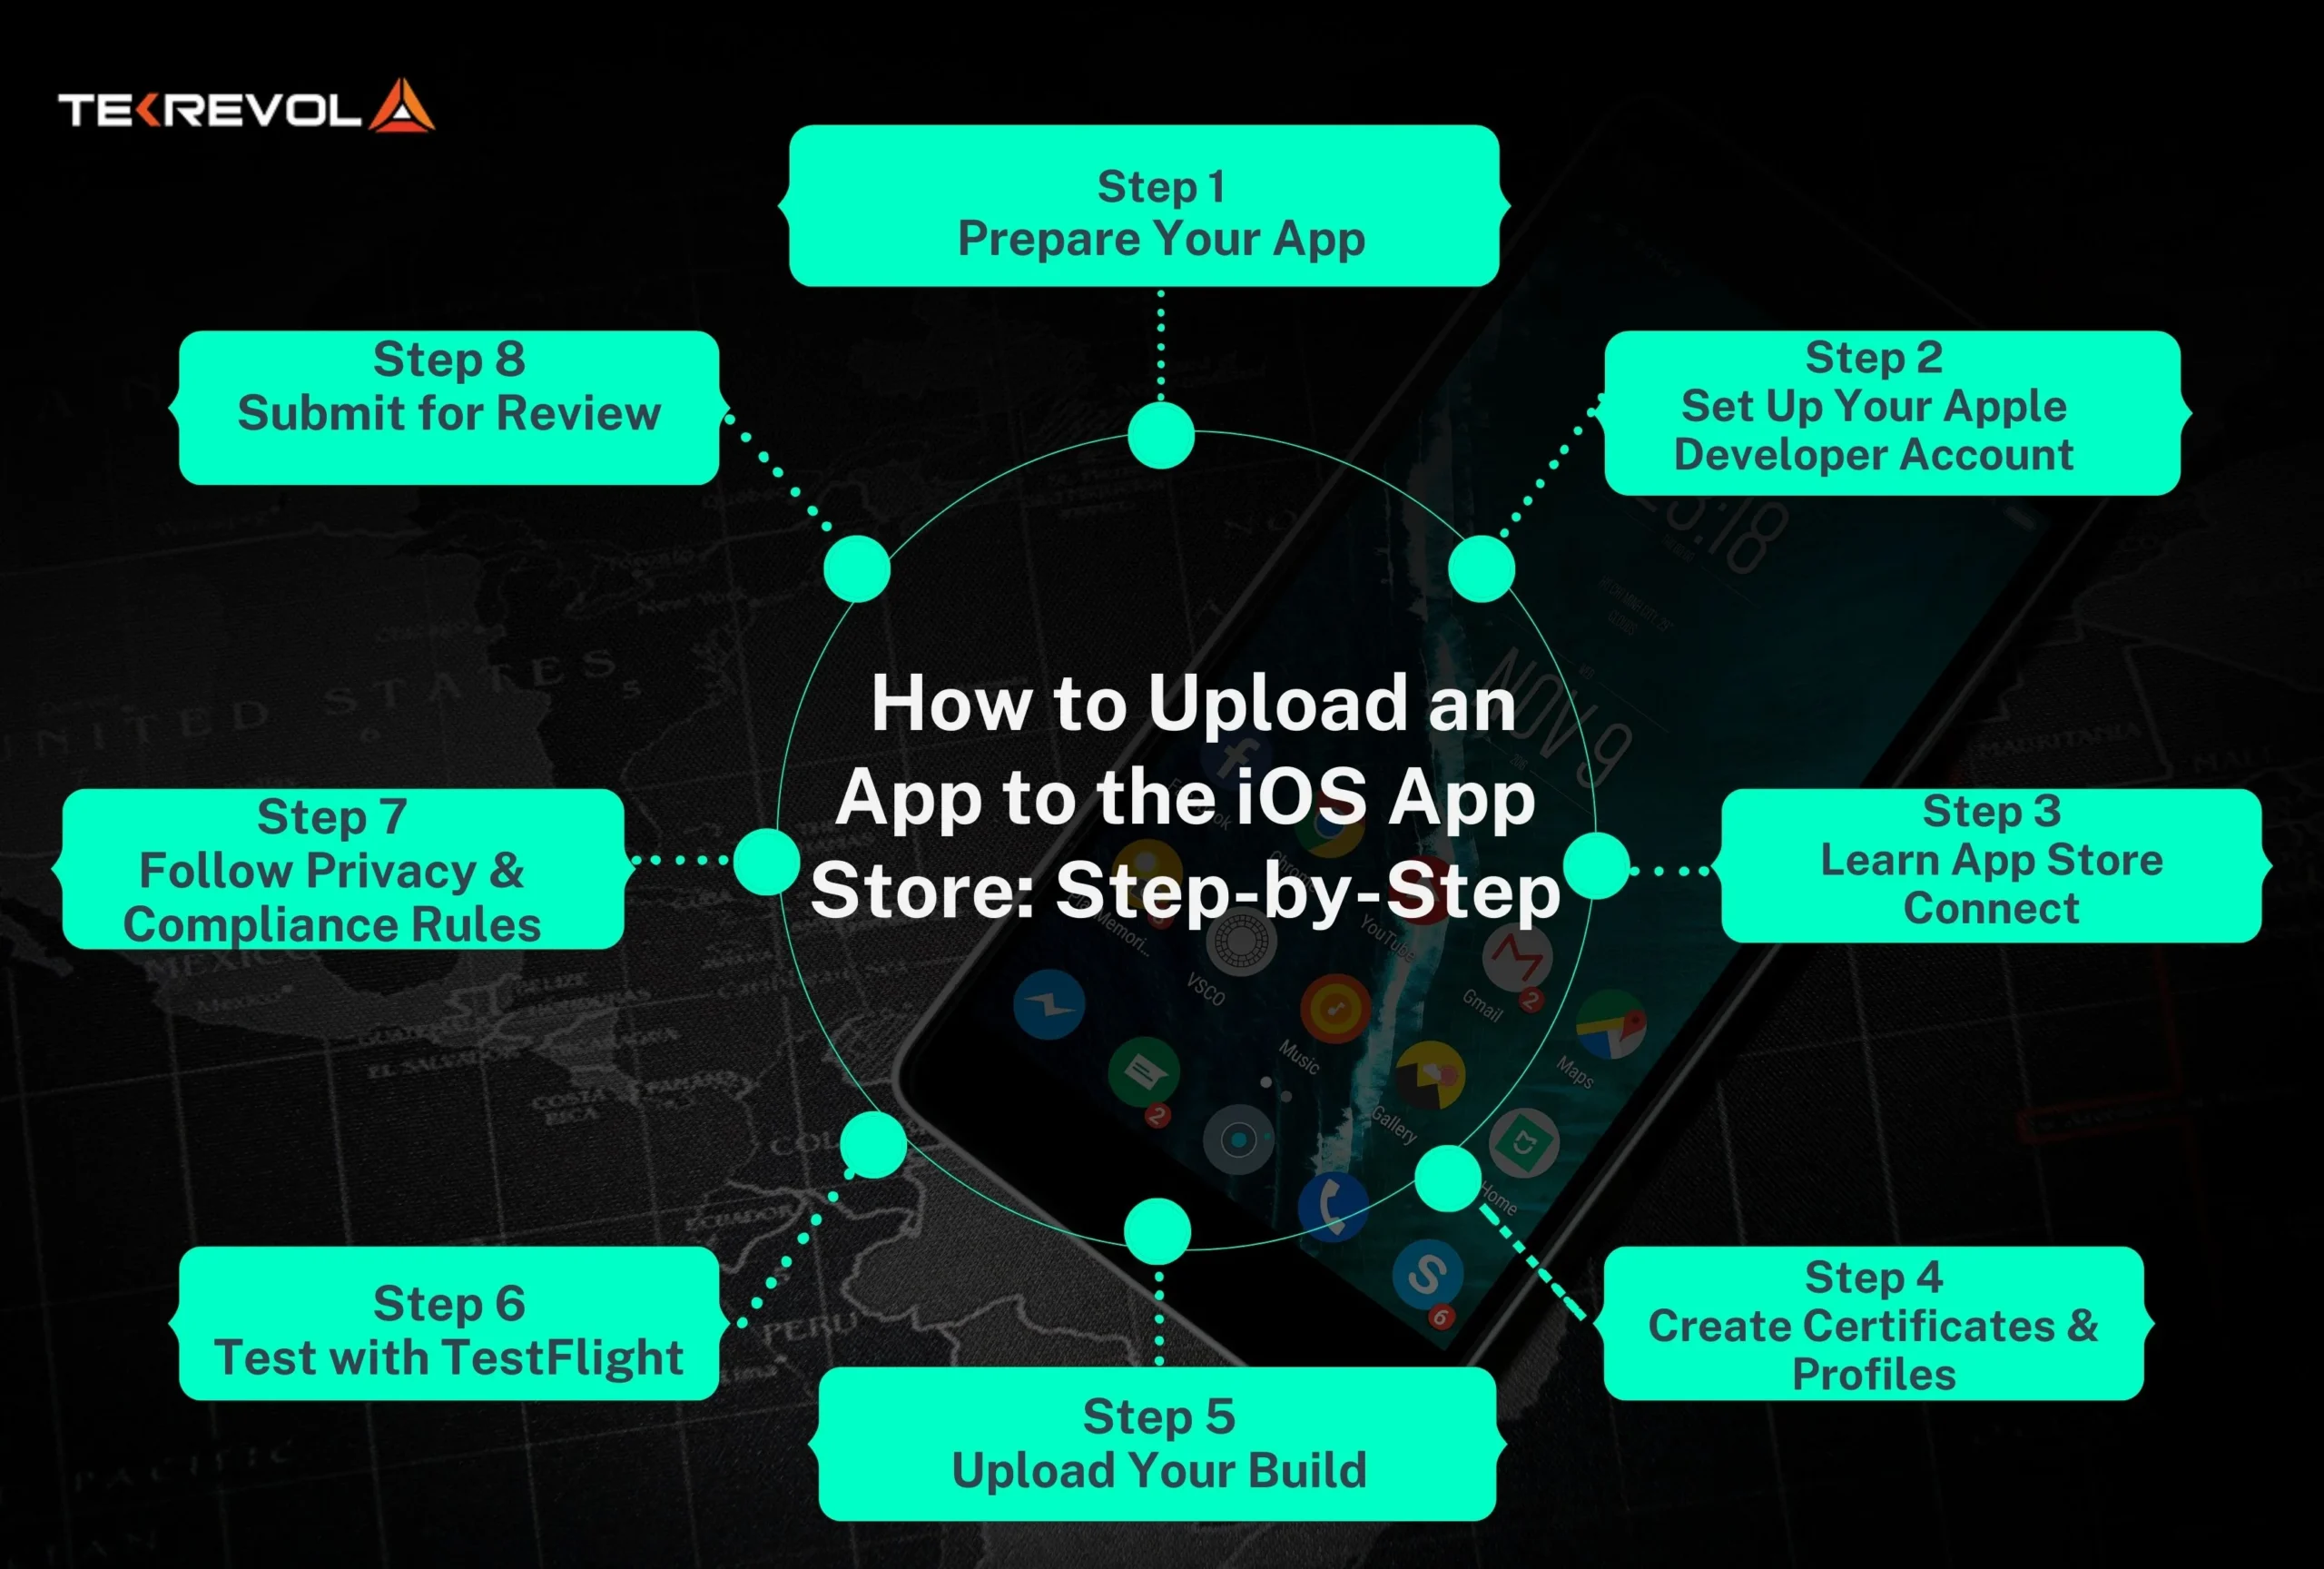
Step 1: Prepare Your App for Submission
You can’t just code something and submit it to the App Store. Here’s how to prepare if you want to upload an App to the iOS App Store:
-
Test on actual devices.
Different sets of combinations of iPhones, iPads, and iOS versions will behave differently.
-
Should be bug and crash-free.
Mobile app users are accustomed to extremely high levels of experience with smooth, responsive applications. Users want apps to start and present a loading experience fast, and ideally with no bugs or crashes.
-
Follow Apple’s Human Interface Guidelines.
Your app should look and feel native to iOS and adhere to standard design conventions.
-
Check content compliance.
Since your goal is to get 2x revenue from your iOS app, the only thing that ensures this growth is your adherence to content compliance.
Saying that, you need to avoid placeholder text, broken links, or incomplete features to get your app accepted at the app store in one go!
Step 2: Set Up Your Apple Developer Account
If you want to upload an App to the iOS App Store, this should be your must-do step. Without it, publishing your app is simply not possible.
-
Know how much it will cost.
Apple charges $99 per year for individual or company developer accounts. However, if you are a large organization that wants to publish its enterprise app, you might want to explore its custom pricing that can be averaged somewhere between $99-$300.
-
What do you need to provide?
You’ll need an Apple ID, verified contact details, and if you’re registering as a company, a D-U-N-S number for business verification.
-
So why do you need it?
The Apple Developer Program gives you freebies like TestFlight to beta test your apps, the most updated developer tools from Apple, and the official way to submit your app to Apple for review.
As a beginner just figuring out how to publish an app in the App Store, signing up for the Apple Developer Program is likely the point in time at which you start making the app a product.
Step 3: Get Familiar with App Store Connect
Think of App Store Connect as your app’s command center to upload an App to the iOS App Store. A one-stop shop for everything you will do for your app, including setting up the app’s name, tracking performance after launch, and everything else.
Without App Store Connect, you will not be able to start the upload of an App to the iOS App Store process.
Here is what important work you will do in App Store Connect:
-
Basic Info:
You will add the name of your app, select the primary language, bundle ID, and an SKU (Stock Keeping Unit) for Apple’s internal references so they know what app it is.
-
Metadata:
This is made up of keywords, categories, and descriptions, and will have an impact on how discoverable your app is in search results while people are trying to find it.
-
Screenshots & Previews:
Apple requires these for all supported devices your app runs. It’s your chance to visually sell your app before someone even downloads it.
-
Privacy Policy:
If your app collects any personal data (even something as small as an email address), Apple will want a publicly accessible privacy policy link.
And here’s a fact you should know:
According to Apple, apps with complete and well-optimized metadata are far more likely to pass review quickly and rank better in search results. So, spending time here is a big part of your app’s discoverability.
A polished App Store Connect setup helps your app stand out after you upload an App to the iOS App Store.
Step 4: Create Certificates, Identifiers & Provisioning Profiles
Think of this as your app’s passport and ID.
- Certificates to prove you’re an authorized developer.
- App IDs that will uniquely identify your application in Apple’s system.
- Provisioning Profiles to link your app, devices, and developer account so it runs securely.
Without these, it won’t be possible for you to upload an App to the iOS App Store.
Ready to see your app approved faster?
Avoid common rejections and get expert guidance every step of the way.
Let’s make it happenStep 5: Send Your Build to Apple for Review
This is the moment your hard work officially steps into Apple’s review pipeline, a big milestone when you upload an App to the iOS App Store.
Here’s how it goes in Xcode:
- Archive Your Project: In the menu, click Product → Archive. This bundles up your app so it’s ready for distribution.
- Distribute the App: Choose App Store Connect as your destination.
- Validate: Xcode will scan for missing assets, errors, or mismatched settings. Fixing these now saves you from rejection headaches later.
- Upload: Send your build straight to App Store Connect, where Apple’s system will start processing it.
Once uploaded, your build will show a “Processing” status. It’s a small word, but it means your app has officially entered Apple’s internal checks before human review.
Interesting fact: According to Apple’s App Review statistics, more than 90% of apps are reviewed in less than one day, but it doesn’t mean your app will be approved yet; the quality and compliance still matter.
Step 6: Test Your App Before the Big Launch
Before your app is published to the public, it’s a good idea to put it through some real-world testing! This could save you from unnecessary grief later when you upload an App to the iOS App Store.
- Internal Testing: You are able to request up to 25 members of your team to immediately try out the app.
- External Testing: Once Apple approves the app, you could distribute the app to up to 10,000 testers – plenty of opportunity to collect varied feedback.
- Collect Feedback: You can use the reports and comments to identify and fix any last-minute bugs or usability problems.
It may feel faster to forgo TestFlight simply, but in the end, it does not produce value. Apple often rejects apps for problems that could have been identified during testing.
Step 7: Meet Apple’s Privacy and Compliance Rules
Apple doesn’t take privacy or legal requirements lightly. It is one of the first things that they look at when you submit an App to the iOS App Store. Forgetting these things could slow down or block your approval.
-
Export Compliance
If your app uses encryption, even standard HTTPS, you need to declare it during submission.
-
Privacy Policy Link
Make sure it is a working link and that it accurately reflects how you handle user data. Apple will check.
-
Login Details for Reviewers
If your app requires sign-in, provide a test account so Apple’s reviewers can use all its features without creating their own.
If you miss this step, your iOS App Store publish will be delayed.
Step 8: Submit for Review
This is the final push before launch.
- Click “Submit for Review” in App Store Connect.
- Average review time will be 24–48 hours; expedited: 4–12 hours.
- Criteria – Apple checks design, functionality, compliance, and performance.
Once approved, you’ve successfully learned how to make an app on the App Store.
Common Rejection Reasons (and How to Avoid Them)
It can be very disheartening to have an app rejected from the iOS App Store after all of the effort and time spent developing it. The good news is that most rejection reasons can be avoided with a little extra diligence before submission.
Here are some of the most common mistakes developers make, along with some tips to avoid them.
1. Bugs or crashes, or slow load times
Apple prefers high-quality applications with a very good user experience. If your app is crashing often or taking too long to load, it will almost always get rejected.
Test your app thoroughly on physical devices, and not just on the simulator.
2. Incomplete features, or placeholder content
Apple will reject apps that feel unfinished. If your app still has empty screens, sample text, and buttons that say, “coming soon”, it tells Apple your product is not ready for real users.
Make sure, before you upload to the store, that every feature works as promised, all of your content is finished and polished.
3. Deceptive descriptions or keywords
Your app listing should reflect the reality of what the app does. If there are features that are over-promised or keywords that have nothing to do with your app are stuffed into the description, chances are you’ll be rejected.
An honest app description helps you to highlight actual benefits, rather than make it seem like something it’s not. Apple will appreciate this type of honesty and transparency, and it will also help relevant users discover your app.
4. Missing privacy documentation
Apple has been very strict on privacy for the last few years. So, if your app collects user data that can even be as simple as an email address, you’ll want to explain how the data is used and protected.
Make sure that privacy is clearly documented within the app and in App Store Connect. Missing or vague privacy documentation is one of the quickest ways to get rejected.
5. Ignoring Apple’s Human Interface Guidelines
Apple wants its apps to feel at home, and if your design blatantly ignores their Human Interface Guidelines, whether it be confusing navigation or buttons that are not present in iOS, you will probably be rejected.
There is no better way to not get approved than to spend 5 minutes checking out Apple’s documentation and make your app feel wrong, such that it doesn’t feel like a “native” experience.
How TekRevol Can Help
Submitting an app to the iOS App Store is not just following a series of steps. It requires strategy, experience, and a deep understanding of Apple’s ecosystem. TekRevol, a leading iOS app development company in USA, provides the expertise needed to navigate this process with confidence.
As a premier provider of digital innovation solutions on a global scale, TekRevol does more than help your business upload an app to the iOS App Store. As an experienced iOS app development company in USA, we focus on optimally positioning your app for long term growth and success.
Whether you want to develop a new iOS app from scratch or need a smoother process from App Store publishing to SEO optimization, TekRevol delivers the technical expertise, design craftsmanship, and industry experience you expect from a trusted iOS app development company in USA.
With TekRevol, your idea can evolve into a globally recognized iOS app faster, smoother, and smarter.
Want your app live on iPhones worldwide?
Let’s do it the right way and upload an App to the iOS App Store without delays.
Take the first step now